本文主要介绍spring boot如何使用JPA来访问Mysql,对单表做简单的增删改查操作。
环境说明:
- IntelliJ IDEA
- JDK 1.8
- spring boot 2.1.0
- Maven 3.5.0
- Mysql
一、初始化mysql
进入mysql,创建数据库,创建数据表,并生成一些测试数据。
1
2
3
4
5
6
7
8
9
10
11
12
13
14
15
16
17
18
19
20
| CREATE DATABASE spring_boot_study;
USE spring_boot_study;
DROP TABLE IF EXISTS `novel_type`;
CREATE TABLE `novel_type` (
`id` int(11) NOT NULL AUTO_INCREMENT,
`novelname` varchar(20) NOT NULL,
`novelauthor` varchar(20) NOT NULL,
`type` varchar(20) NOT NULL,
`introduce` text NOT NULL,
`download` varchar(20) DEFAULT 'false',
PRIMARY KEY (`id`)
) ENGINE=InnoDB DEFAULT CHARSET=utf8;
INSERT INTO `novel_type` VALUES ('1', '大主宰', '天蚕土豆', '连载中', '大千世界,位面交汇,万族林立,群雄荟萃,一位位来自下位面的天之至尊,在这无尽世界,演绎着令人向往的传奇,追求着那主宰之路。 无尽火域,炎帝执掌,万火焚苍穹。 武境之内,武祖之威,震慑乾坤。 西天之殿,百战之皇,战威无可敌。 北荒之丘,万墓之地,不死之主镇天地。 ...... 少年自北灵境而出,骑九幽冥雀,闯向了那精彩绝伦的纷纭', 'true');
INSERT INTO `novel_type` VALUES ('2', '斗破苍穹', '天蚕土豆', '已完结', '这里是属于斗气的世界,没有花俏艳丽的魔法,有的,仅仅是繁衍到巅峰的斗气! 新书等级制度:斗者,斗师,大斗师,斗灵,斗王,斗皇,斗宗,斗尊,斗圣,斗帝。', 'true');
INSERT INTO `novel_type` VALUES ('3', '都市无上仙医', '断桥残雪', '已完结', '他当过搬砖工,当过酒吧服务生,当过办公室文员,当过老师,当过医生……他是千千万万打工仔中的一名,为了生计而奔波劳碌,但同时他却又是一位得上古巫王夏禹血脉传承的巫师。 巫,上一横顶天,下一横立地,中间一竖直通天地,中统人与人,是真正通天达地,掌控天地万物生灵之大能者!', 'true');
INSERT INTO `novel_type` VALUES ('4', '遮天', '辰东', '已完结', '冰冷与黑暗并存的宇宙深处,九具庞大的龙尸拉着一口青铜古棺,亘古长存。 这是太空探测器在枯寂的宇宙中捕捉到的一幅极其震撼的画面。 九龙拉棺,究竟是回到了上古,还是来到了星空的彼岸? 一个浩大的仙侠世界,光怪陆离,神秘无尽。热血似火山沸腾,激情若瀚海汹涌,欲望如深渊无止境…… 登天路,踏歌行,弹指遮天。', 'true');
|
二、Spring boot配置
2.1 application.yml
根据个人喜好选择配置文件的类型,在这里我选择配置application.yml,主要对datasource与jpa进行一些配置说明。
1
2
3
4
5
6
7
8
9
10
11
12
13
14
| spring:
datasource:
driver-class-name: com.mysql.cj.jdbc.Driver
url: jdbc:mysql://localhost:3306/spring_boot_study?allowMultiQueries=true&serverTimezone=GMT%2B8
username: root
password: root
jpa:
hibernate:
ddl-auto: update
show-sql: true
server:
port: 8081
servlet:
context-path: /spring-boot-study
|
注意:如果通过jpa在数据库中建表,将spring.jpa.hibernate,ddl-auto改为create,建完表之后,再改为update,要不然每次重启工程会删除表并新建。
2.2 pom.xml
至少引入下面四个依赖:
1
2
3
4
5
6
7
8
9
10
11
12
13
14
15
16
17
18
19
20
21
|
<dependency>
<groupId>org.springframework.boot</groupId>
<artifactId>spring-boot-starter-jdbc</artifactId>
</dependency>
<dependency>
<groupId>mysql</groupId>
<artifactId>mysql-connector-java</artifactId>
<scope>runtime</scope>
</dependency>
<dependency>
<groupId>org.springframework.boot</groupId>
<artifactId>spring-boot-starter-web</artifactId>
</dependency>
<dependency>
<groupId>org.springframework.boot</groupId>
<artifactId>spring-boot-starter-data-jpa</artifactId>
</dependency>
|
三、具体编码
概括,本篇文章实现的功能有:
- 查询表中所有数据
- 查询表中所有数据的条数
- 通过小说作者来查询数据
- 向表中插入或更新一条数据
- 根据小说id来判断数据是否存在
- 根据小说id来删除数据
- 根据小说名称来删除数据
3.1 实体(Entity)层
1
2
3
4
5
6
7
8
9
10
11
12
13
14
15
16
17
18
19
20
21
22
23
24
25
26
27
28
29
30
31
32
33
34
35
36
37
38
39
40
41
42
43
44
45
46
47
48
49
50
51
52
53
54
55
56
57
58
59
60
61
62
63
64
65
66
67
68
69
70
71
72
73
74
75
76
77
78
79
80
81
82
83
84
85
86
87
88
89
90
91
| package com.study.spring.entity;
import javax.persistence.Column;
import javax.persistence.Entity;
import javax.persistence.Id;
import javax.persistence.Table;
@Entity
@Table(name="novel_type")
public class NovelEntity {
@Id
@Column(name = "id")
private Long id;
@Column(name = "novelname")
private String novelName;
@Column(name = "novelauthor")
private String novelAuthor;
@Column(name = "type")
private String type;
@Column(name = "introduce")
private String introduce;
@Column(name = "download")
private String download;
public Long getId() {
return id;
}
public void setId(Long id) {
this.id = id;
}
public String getNovelName() {
return novelName;
}
public void setNovelName(String novelName) {
this.novelName = novelName;
}
public String getNovelAuthor() {
return novelAuthor;
}
public void setNovelAuthor(String novelAuthor) {
this.novelAuthor = novelAuthor;
}
public String getType() {
return type;
}
public void setType(String type) {
this.type = type;
}
public String getIntroduce() {
return introduce;
}
public void setIntroduce(String introduce) {
this.introduce = introduce;
}
public String getDownload() {
return download;
}
public void setDownload(String download) {
this.download = download;
}
@Override
public String toString() {
return "NovelEntity{" +
"id=" + id +
", novelName='" + novelName + '\'' +
", novelAuthor='" + novelAuthor + '\'' +
", type='" + type + '\'' +
", introduce='" + introduce + '\'' +
", download='" + download + '\'' +
'}';
}
}
|
3.2 DAO层
数据访问层,通过编写一个继承自JpaRepository的接口就能完成数据访问,其中包含了基本的单表查询的方法,非常的方便。
1
2
3
4
5
6
7
8
9
10
11
12
13
14
15
16
17
18
19
20
21
22
23
24
25
26
27
28
29
30
31
32
33
34
35
36
37
38
39
40
41
42
43
| package com.study.spring.jpa;
import com.study.spring.entity.NovelEntity;
import org.apache.ibatis.annotations.Param;
import org.springframework.data.jpa.repository.JpaRepository;
import org.springframework.data.jpa.repository.JpaSpecificationExecutor;
import org.springframework.data.jpa.repository.Modifying;
import org.springframework.data.jpa.repository.Query;
import org.springframework.transaction.annotation.Transactional;
import java.io.Serializable;
import java.util.List;
public interface INovelDAO extends JpaRepository<NovelEntity, Long>,
JpaSpecificationExecutor<NovelEntity>
{
@Query("select nt from NovelEntity nt where nt.novelAuthor = ?1 and nt.type = ?2")
List<NovelEntity> findByAuthorAndType(String author, String type);
@Transactional(rollbackFor = Exception.class)
@Modifying
@Query("delete from NovelEntity nt where nt.novelName = ?1")
void deleteByNovelName(String novelName);
}
|
说明:
- 接口类继承
JpaRepository后,该接口类就可以直接使用自带的findAll(),count(),save(),deleteById()等方法。方法功能可以通过方法名称了解。
- 如果需要一些自定义操作或者复杂查询的话,需要在继承
JpaRepository的接口里面编写JPQL语句,查询语句需要在方法上加注解@Query,增加/修改/删除语句需要在方法上加注解@Transactional、@Modifying、@Query。
JPQL语句与SQL语句略有不同,JPQL语句是对实体进行操作,属性也是实体类里面的属性,而非表字段。
3.3 Service层
由接口类与实现类组成:
接口类:
1
2
3
4
5
6
7
8
9
10
11
12
13
14
15
16
17
18
19
20
21
22
23
24
25
26
27
28
29
30
31
32
33
34
35
36
37
38
39
40
41
42
43
44
45
46
47
48
49
50
51
52
53
54
55
56
57
58
| package com.study.spring.service;
import com.study.spring.entity.NovelEntity;
import java.util.List;
public interface INovelService {
List<NovelEntity> findAll();
List<NovelEntity> findByAuthorAndType(String author, String type);
long count();
void saveNovel(NovelEntity novelEntity);
boolean exists(Long id);
void deleteById(Long id);
void deleteByNovelName(String novelName);
}
|
实现类:
1
2
3
4
5
6
7
8
9
10
11
12
13
14
15
16
17
18
19
20
21
22
23
24
25
26
27
28
29
30
31
32
33
34
35
36
37
38
39
40
41
42
43
44
45
46
47
48
49
50
51
| package com.study.spring.service;
import com.study.spring.entity.NovelEntity;
import com.study.spring.jpa.INovelDAO;
import org.springframework.beans.factory.annotation.Autowired;
import org.springframework.stereotype.Service;
import java.util.List;
@Service
public class NovelServiceImpl implements INovelService {
@Autowired
private INovelDAO inovelDAO;
@Override
public List<NovelEntity> findAll() {
return inovelDAO.findAll();
}
@Override
public List<NovelEntity> findByAuthorAndType(String author, String type) {
return inovelDAO.findByAuthorAndType(author, type);
}
@Override
public long count() {
return inovelDAO.count();
}
@Override
public void saveNovel(NovelEntity novelEntity) {
inovelDAO.save(novelEntity);
}
@Override
public boolean exists(Long id) {
return inovelDAO.existsById(id);
}
@Override
public void deleteById(Long id) {
inovelDAO.deleteById(id);
}
@Override
public void deleteByNovelName(String novelName) {
inovelDAO.deleteByNovelName(novelName);
}
}
|
说明:
- 需要在Serivice层的实现类里面加入注解@Service
- 通过注解@Autowired来引用DAO层的接口INovelDAO
3.4 Controller
1
2
3
4
5
6
7
8
9
10
11
12
13
14
15
16
17
18
19
20
21
22
23
24
25
26
27
28
29
30
31
32
33
34
35
36
37
38
39
40
41
42
43
44
45
46
47
48
49
50
51
52
53
54
55
56
57
58
59
60
61
62
63
64
65
66
67
68
69
70
71
72
73
74
75
76
77
78
79
80
81
82
83
84
85
86
87
88
89
90
91
92
93
94
95
96
97
98
99
100
101
102
103
104
105
106
107
108
109
110
111
112
| package com.study.spring.controller;
import com.study.spring.entity.NovelEntity;
import com.study.spring.service.INovelService;
import org.springframework.beans.factory.annotation.Autowired;
import org.springframework.web.bind.annotation.*;
import java.util.HashMap;
import java.util.List;
import java.util.Map;
@RestController
@RequestMapping("novel")
public class NovelController {
@Autowired
private INovelService iNovelService;
@RequestMapping("list")
public List<NovelEntity> findAll() {
return iNovelService.findAll();
}
@RequestMapping("count")
public long count() {
return iNovelService.count();
}
@RequestMapping(value = "save", method = RequestMethod.POST)
public Map<String, Boolean> saveNovel(NovelEntity novelEntity) {
Map<String, Boolean> map = new HashMap<>();
try {
iNovelService.saveNovel(novelEntity);
map.put("status", true);
} catch (Exception e) {
e.printStackTrace();
map.put("status", false);
}
return map;
}
@RequestMapping(value = "findByAuthorAndType", method = RequestMethod.GET)
public List<NovelEntity> findByAuthorAndType(@RequestParam(value = "author", required = false, defaultValue = "天蚕土豆") String author,
@RequestParam(value = "type") String type) {
List<NovelEntity> neList;
neList = iNovelService.findByAuthorAndType(author, type);
return neList;
}
@RequestMapping(value = "id/{id}", method = RequestMethod.DELETE)
public Map<String, Boolean> deleteById(@PathVariable("id") Long id) {
Map<String, Boolean> map = new HashMap<>();
boolean exists = iNovelService.exists(id);
try {
if (exists) {
iNovelService.deleteById(id);
map.put("status", true);
} else {
map.put("status", false);
}
} catch (Exception e) {
e.printStackTrace();
map.put("status", false);
}
return map;
}
@RequestMapping(value = "deleteByNovelName", method = RequestMethod.DELETE)
public Map<String, Boolean> deleteByNovelName(@RequestParam(value = "novelName", required = false) String novelName) {
Map<String, Boolean> map = new HashMap<>();
try {
iNovelService.deleteByNovelName(novelName);
map.put("status", true);
} catch (Exception e) {
e.printStackTrace();
map.put("status", false);
}
return map;
}
}
|
说明:
- 需要在Controller层的类上面加入注解@RestController与@RequestMapping(“xxx”)
- 通过注解@Autowired来引用Service层的接口INovelService
- 前后端参数交互使用@RequestParam,默认必须在url中指明参数,如果不需要指明该参数,可以使用
@required = false,详情可参考上述代码中的findByAuthorAndType()。
- url参数使用还可使用
@PathVariable,该注解的参数仅限于url传参,具体使用可参考上述代码的deleteById()。
四、功能测试
通过Jrebel v2018.2.2来启动spring boot程序,可以实现热部署(代码修改即时生效)。
查询所有数据
浏览器访问http://localhost:8081/spring-boot-study/novel/list查询所有数据,如下图所示:

获取表中所有数据的个数
浏览器访问http://localhost:8081/spring-boot-study/novel/count,获取表中数据个数,如下图所示:

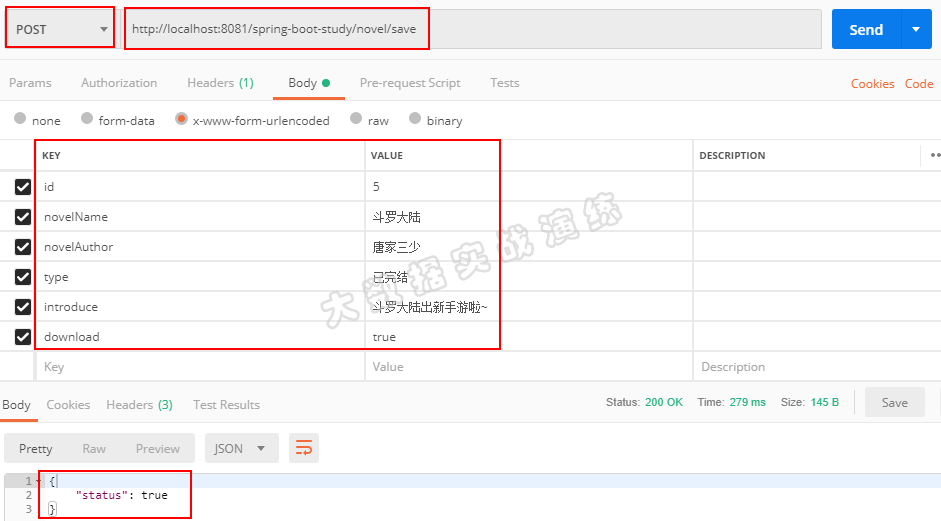
插入或更新数据
通过小说作者和小说类型来查询数据
浏览器访问http://localhost:8081/spring-boot-study/novel/findByAuthorAndType?author=天蚕土豆&type=已完结,如下图所示:

根据表的id来删除数据

根据小说名称来删除数据

五、注解概述
1. @Entity:对实体注释
2. @Table:声明此对象映射到数据库的数据表
3. @Id:声明此属性为主键
4. @Column:声明该属性与数据库字段的映射关系。
5. @Service注解:用于标注Service层组件,标注在实现类上。
6. @Autowired
这是一个非常常见的注解。
比如在上述代码示例中所示:在Controller层,需要使用@Autowired来调用Service层;在Service层,需要使用@Autowired来调用DAO层;在DAO层实现类中,通过@Autowired来调用JdbcTemplate。
7. @RestController
Spring4之后新加入的注解,原来返回json需要@ResponseBody和@Controller配合。即@RestController是@ResponseBody和@Controller的组合注解。
8. @RequestMapping :配置url映射
9. @PathVariable:url参数化
当使用@RequestMapping URI template样式映射时, 即someUrl/{paramId},这时的paramId可通过 @Pathvariable注解绑定它传过来的值到方法的参数上。具体可见上述实例的删除代码逻辑。
10. @RequestParam
@RequestParam来映射请求参数,required表示是否必须,默认为true,defaultValue可设置请求参数的默认值,value为接收前台参数的参数名。
11. @Query
可在该注解上编写JPQL语句,例如:@Query("select nt from NovelEntity nt where nt.novelAuthor = ?1 and nt.type = ?2")
12. @Modifying
与注解@Query一起使用,@Modifying一般适用于增加/修改/删除的JPQL语句,例如:@Query("delete from NovelEntity nt where nt.novelName = ?1")
13. @Transactional
事务注解。在本篇文章中,@Query("delete from NovelEntity nt where nt.novelName = ?1")之上需要添加注解@Modifying和@Transactional,否则会报错。
import 的包为:import org.springframework.transaction.annotation.Transactional;
六、总结
前面写了这么多,可算到总结了。现在用几句话来概括一下:
- 首先需要创建数据库,数据表
- 修改yml配置文件,配置datasource与jpa
- 在pom文件中引入相关依赖
- 具体编码。编写Entity类,然后通过继承
JpaRepository接口来操作Mysql,也可以自定义编写JPQL语句,最后在Service层实现业务逻辑,在Controller层制作api展示数据。
- 会使用基础注解
源码已上传至https://github.com/841809077/spring-boot-study,欢迎Star。


